
For this month’s challenge, Island Batak partnered with Deb Tucker of Studio 180 Design, and the Ambassadors were tasked with making a quilt that will be donated to Sleep in Heavenly Peace/Quilts Across America https://shpbeds.org. Each year the month of July is designated as the Quilts Across America month, initiated by Studio 180 Design and Tucker University in 2023. SHP is a national organization answering the call to help make sure that kids have a bed and quilts to keep them warm.
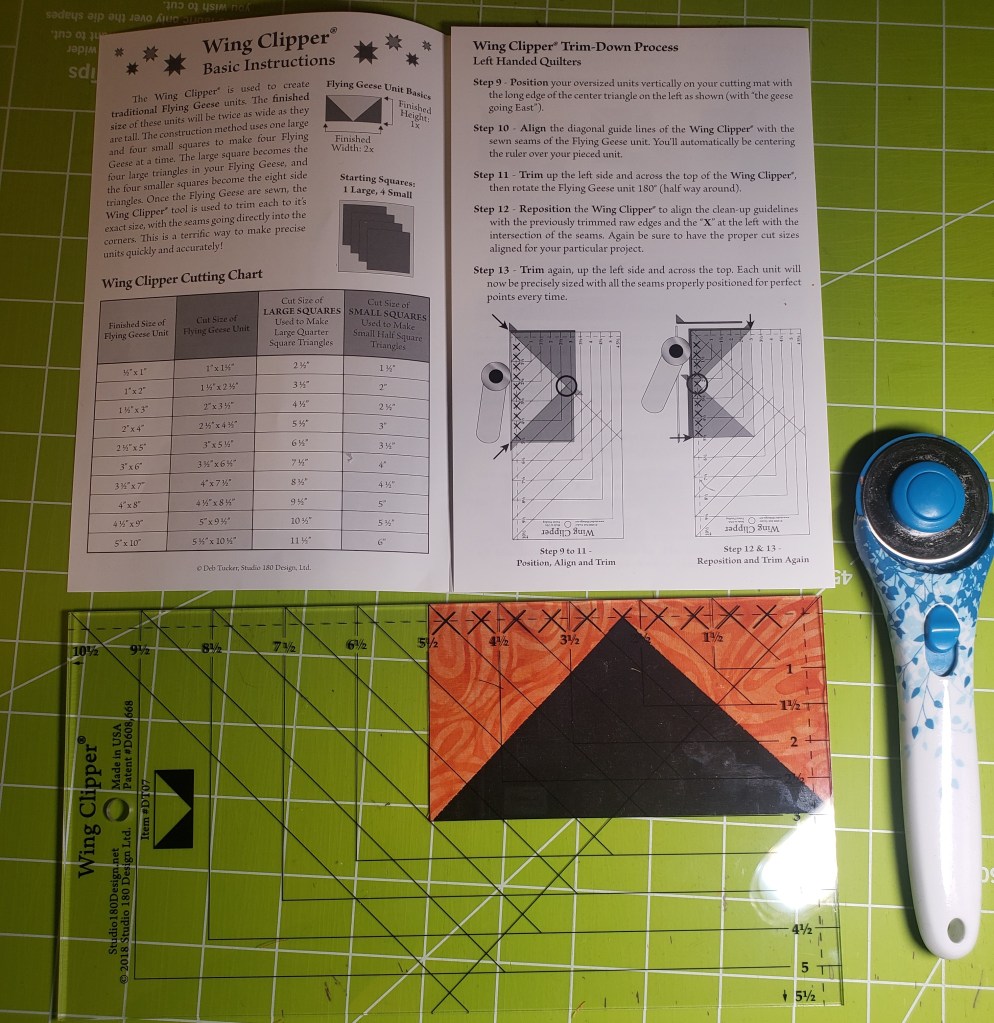
For my challenge, I was provided with Deb Tucker’s Wing Clipper specialty ruler which was designed for making flying geese. This is my second time using Studio 180 rulers, and this time it pushed me to learn a new technique for making flying geese.

As most of you have too, I’ve made thousands of flying geese, but this time I wanted to make something different and fun. This is usually a simple process for me, but for some reason this time I was stumped. So, I decided to surf the web looking for ideas, checking the most popular social media platforms. Although I found a few ideas, nothing really piqued my interest. I was looking for something that would cry out “MAKE ME! MAKE ME!”, but instead… crickets. I then got a bright idea, I decided to check with my new BFF – EQ8. Well, that was a huge letdown, too.
So, now what? Thinking, thinking, thinking… AHA! Deb Tucker’s website! I should have started there in the first place!!! After scrolling through the pages… I finally saw it, “MAKE ME! MAKE ME!” It was Love Links! A Companion Pattern for Studio 180 Designs Wing Clipper®! As I always do, I first tried to figure out how to make a pattern, but it was taking too much time. So, I decided to take a shortcut and bought the pattern.

With the pattern in hand, I reviewed the size and fabric requirements for this month’s challenge: size between 50” to 60” wide and 75” to 90” long, and colors that appeal to kids and young adults from 3 to 17 years of age. That was easy because I’m a kid at heart. I chose Island Batiks’ Dots & Doodles and Love & Peace, which are brightly colored fabrics, and are my favorite colors to work with. Every quilter knows that when you are making a quilt you should choose colors and fabrics that you enjoy working with because you’ll be spending a long time looking at them as you make the quilt. When I first started quilting my mentor said to me “you know this is not a quilt you can get done in a day,” and that has stuck with me ever since. That’s why I choose the colors I do. Thank you, Debbie Chase, for that advice.
Using EQ8 (having forgiven it since previously letting me down – see paragraph 3) I uploaded the Dots & Doodles and Love & Peace fabrics into EQ8. I then colored the design and printed out the color photo for reference. I also printed a line drawing so I could see which way the geese needed to be placed in each line. I really do love EQ8 because it makes my life so much easier by being able to see what the quilt will look like before cutting out the fabric and sewing the quilt together.


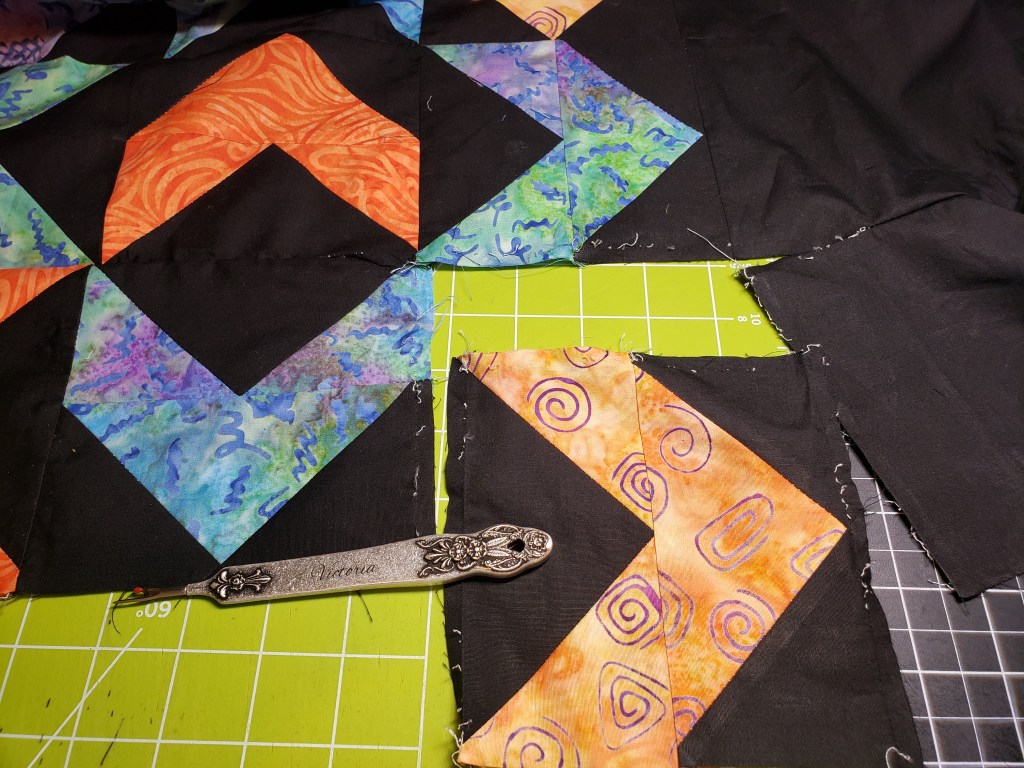
Using the Studio 180 Wing Clipper ruler made cutting out the flying geese a breeze. Half of the flying geese block was a bright colored triangle with black wings, and the other half was a black triangle with bright colored wings; together the two halves completed one flying geese block. I made 8 blocks each of this color way to complete the quilt. Looking at the color reference photo, I then organized the blocks in rows following the direction of the geese, and then stacked them accordingly for each row. All rows accounted for I started to sew the rows together making sure everything was going in the right direction – having stacked them accordingly. But when I got to the last few rows, I found that one of the geese had left the team and was headed south for the winter and needed to be redirected … with my seam ripper!!! With all the geese subsequently accounted for and heading north, their flight plan is on its final approach to their new destination!
Now that the top was complete, on to the borders. I love a multi pieced border that has mitered corners. Yes, I know that you have to make a “Y” seam to miter the corners, but I love “Y” seams almost as much as I love having surgery. Now that’s a story for another day! But seriously, I really do love both!! I know, I’m a little crazy, but don’t forget who I’m talking about!
After I cut out the border fabrics, I sewed them together in a long strip. I then measured the quilt top and added a ¼” to the border and cut it at a 45-degree angle. Voila! The borders are ready to be mitered! But hold up! For whatever reason I didn’t correctly add the length and the width of the top, and my first border was too short. Wait, what?! Too short?! Crap! It would be one thing to do it wrong once, but I’ve done this before on a different quilt. UGH!!! So, I had to find where I had pieced the border together, rip it out and add more fabric. I then remeasured the length or the quilt top and cut a new 45-degree angle. The sad part is that I’m getting really good at fixing this mistake; I’m looking forward to the time I will correctly “measure twice and cut once,” but I’m not holding my breath! Although… I do look good in blue!
With a sigh of relief, all four borders were on and the “Y” seams were complete; I was a very happy camper! I’m really pleased with the way this quilt turned out, it’s really nice. This is a quilt that I would have liked to keep. But knowing it’s going to keep a child in need warm, and that it will be loved by someone very special, fills my heart with joy. Besides, I still have the pattern and more fabrics, and I can make another one whenever I want to.
So, what did I learn this month?
Sometimes having complete freedom to create anything you want is not that easy, but still doable with imagination and effort.
With every stitch, even though I have no idea who a “donation quilt” will go to, makes every “seam ripper” moment tolerable and so worth it!
Flying geese don’t have to look like your standard triangle in a block. When mixed with different fabrics they look totally different, and I like that.
Being given beautiful fabric is a blessing and it needs to be shared with everyone.
Redirecting geese that have flown the coop is really helpful when it comes to design.

Thank you to our sponsors:
Island Batik for the beautiful fabrics.
Deb Tucker of Studio 180 for the Wing Clipper ruler.
Aurfil for the beautiful gray thread, no I didn’t use black thread my eyes are not as young as they used to be.
Schmetz needles for being ever so trusty to get the job done.
Oliso Iron for the beautiful pressing job every time.
Hobbs Tuscany batting for making the quilt comfy.
Until next time, what is on your sewing table today?
A special thank you to Susan Zubillaga for doing a great job with the quilting!!
Until next time, what’s on your sewing table?
Victoria aka Tori


Leave a reply to pamelaquilts Cancel reply