Island Batik Fabrics
Well, now that I am an Island Batik Ambassador for 2023, the challenges have begun! What did I get myself into???

My first challenge was to make a video of me unboxing the first shipment of goodies from Island Batiks – a variety of fabrics, batting, a ruler, needles and thread. I had the perfect plan for how to make this video unique to me – entertaining, informative, and so on. But in the end, the new ring light and lighting in general, and my sister and I trying to figure out how to use the video function on my phone, was enough to make us both crazy! When all was said and done, the final product was nothing even remotely close to what I had envisioned, but we got it done and posted it to social media. Oh my! That was an adventure in and of itself! But all in all we learned something new and we both still have all of our hair and neither of us cried (there’s no crying in quilting). I would say that was a win-win for both of us.
Next up on the challenge was to create a Puffy Quilt. You ask “what is that??” Well it is a quilt that I thought I would NEVER make, but you know how it goes when you say never.

I started by looking at YouTube for videos on how to make it and quickly realized why I never wanted to make one, and thought to myself “there has to be a better way to do this,” and sure enough there was. It’s amazing what you can find when you dig a little deeper (thank you YouTube).
I found a YouTube video called The Puffy Quilt the Easy Way. Easy way? Yes please! So I watched the video several times until I understood the process and thought “I can do this… no problem!” And I decided at this point that I will use HSTs (half square triangles) to make the blocks. Well, the problem wasn’t the video it was me. The video was very easy to follow and clear on how to construct a puffy quilt. The problems started when I came up with the bright idea to make a unique quilt to help young children learn how to count. Using two each of the colors from the 20 half yard bundle of Island Batik Princess Rose fabric – resulting in 10 colorway blocks, each block would correlate with a number. I even came up with a brilliant name – “Skip Quilt!” In hindsight, I can’t help but think that I should have left well enough alone and made a simple Puffy Quilt.

Continuing on my journey, I created a layout for the “Skip Quilt” using a spreadsheet (see below) – 15 blocks across, 15 blocks down. For my color choices, I chose a light and dark color (resulting in 10 color combinations) for the HSTs to make into blocks. Each block was then assigned a number from 1-10. For the design, I chose a circular pattern from the outside in, starting with block number 1 in the top left corner. Once I reached block number 10, I started over with block number 1, continuing this pattern to the center of the quilt.
The pattern: Block #1 is a “skip space” using the white fabric; a “skip space” is the break between each number. Block #2 is where the counting and the HST blocks begin, using 1 block for the number 1. Block #3 is a “skip space.” Block #4 and #5 are new colorway blocks, using these 2 blocks for the number 2. Block #6 is a “skip space.” Blocks #7, #8, and #9 are another new colorway block, using 3 of these blocks for the number 3. Are you following along? Ingenious, right?
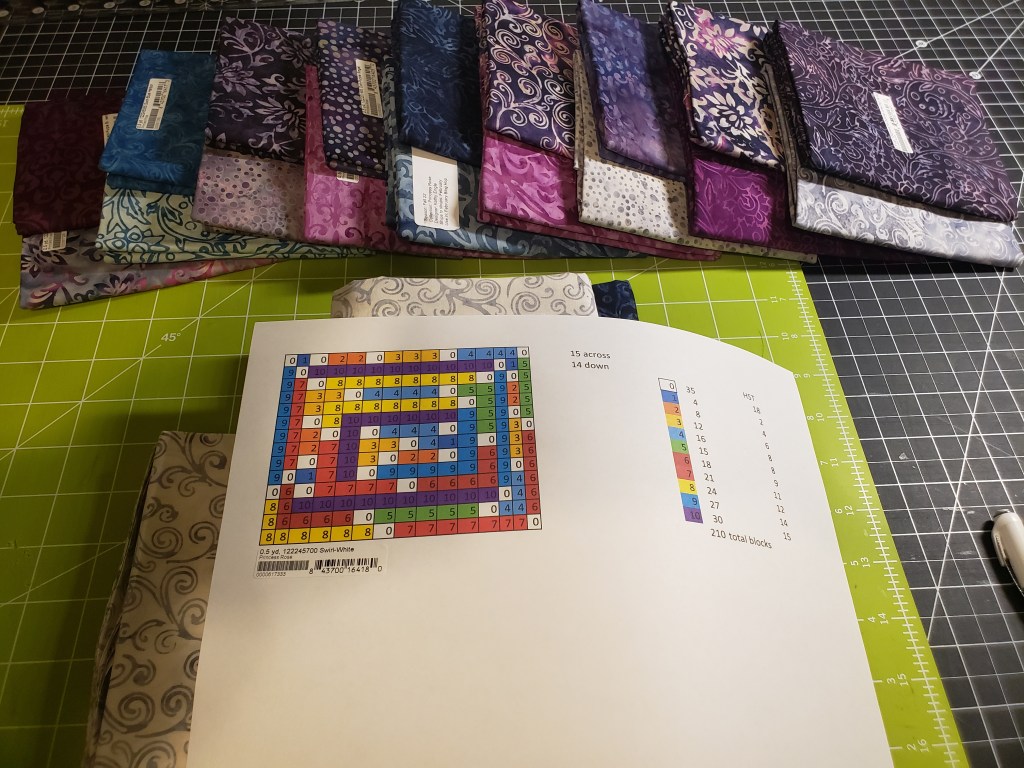
But then… there it was! A flaw in my spreadsheet!!! I realized that I only had 14 rows down, which meant that I had to go back to the beginning and make a new spreadsheet, correcting this design flaw… ugh!
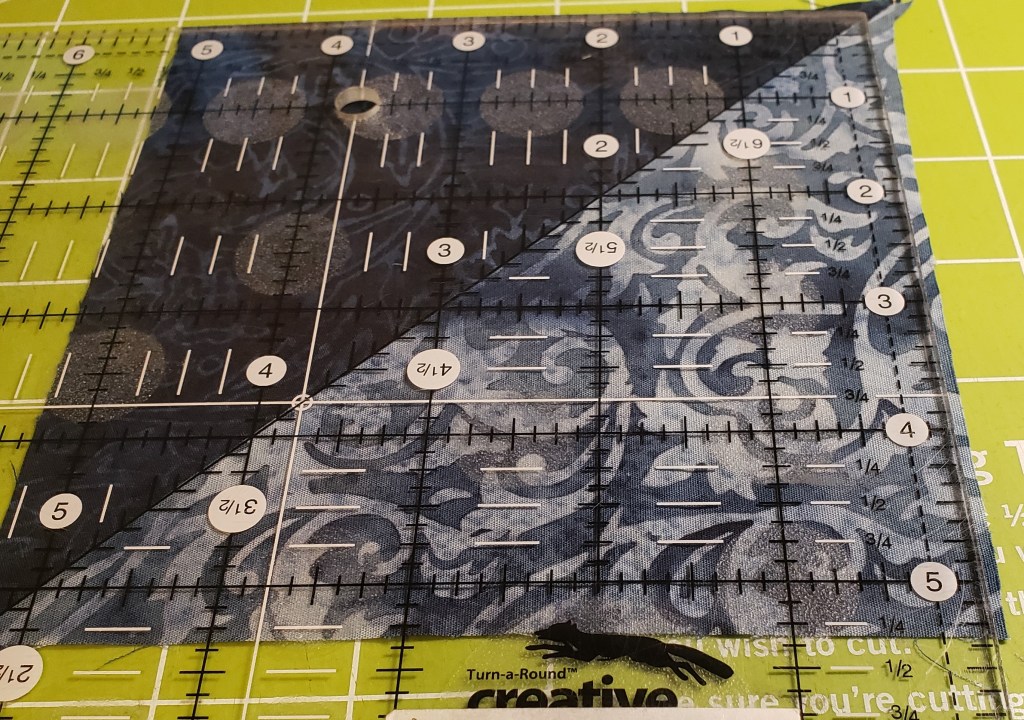
So this second time around I counted correctly, 15 rows across, 15 rows down. Once again, I start out with the “skip block,” white fabric. No change to any colors in the HST blocks. But in my excitement, somewhere along the way I made another mistake in the layout. This time, I missed a “skip space.” Back to the spreadsheet and I have another bright idea! You’re thinking “third time’s a charm,” right? So this time I made the squares in the spreadsheet bigger and colored them in so I could see what I was doing better, and if I made a mistake this time I would catch it right away, right? Of course this was labor-intensive, as if the other attempts were not, and it wasn’t any easier this time around, but at least this third attempt was done. So now I’m ready to cut my fabric into 5-3/8″ squares for the HSTs. I calculated how many squares per color I needed according to the second spreadsheet and started to cut my fabrics. Woo-hoo! I’m making progress, I’m on a roll!. Or am I?
I get all of the HST blocks made and I’m ready to lay them out. I chose to use my queen sized bed as my “design wall” to see how it will look. Well… here we go again! Do I need to say it?! It didn’t work! My “design wall” wasn’t big enough to fit all of the blocks! Plus, the way I laid it out was not the usual way – you know, row by row. I did it in the circular pattern from 1 to 10 all the way around!!! Yikes! Time for a drink (grape Koolaid)!
So, after a much needed break, re-energized and clear-headed, I get back to my “design wall” and decide that I don’t like the way it looks… you got it! Starting over again, I decide that this time I’m going to follow the layout on the spreadsheet, row by row. Cross your fingers that this will work. IT DID (hmmm, did I miss something?)!! But now I have to decide which way the HST blocks will face. Going back to the spreadsheet with a plan and a highlighter in hand (wait, weren’t all of these attempts thoughtfully planned out?), I made all of the HST blocks go in the direction that I wanted them to, so now I am set! Let the sewing begin!!
For those of you who don’t know me, I have an uncanny attention to detail when it comes to pressing the seams on my quilts. I have my trusty Acorn Pressing Pen filled with pressing starch and I run it over every seam before I get the iron. This seems like a lot of work, and it is, but the result is amazing. I realized that when I pressed the Island Batik fabrics with the Acorn Pressing Pen it was like the two fabrics became one. I couldn’t feel where the seam was, I was so impressed to say the least.

Another task that required my attention to detail was when I needed to pleat each 5-3/8″ block on all four sides to allow for the puffiness. So of course, I reached for my handy-dandy ruler and Acorn Pressing Pen and went to town making them all the same. Once the pleats were pressed I took the blocks to my Bernina 770QE and secured the pleats with a basting stitch.

Next, stitching the rows together according to the spreadsheet so they’d be spot on… “Wait a minute! WHAT? I don’t have enough of the right colored HST blocks? You’ve got to be kidding!” This is really getting old! Back to the cutting board. I can see the light at the end of the tunnel, or is that a train? But wait! I still have to stuff the rows – all 15×15 of them! What was I thinking? Why did I make this puffy thing so big? Well, truth be told, when I do something it’s “go BIG or go home!”
I have another bright idea! Boy, it’s getting really bright in here!!! I think I need to turn on more lights when I’m sewing so these bright ideas stop popping up… and this one was a big one! I think to myself “let’s add some prairie points all around the quilt because I have extra squares left over and what am I going to do with them?” My answer should have been “put them in the scrap bin.” But noooo, that would have been a brighter idea! I am now making more work for myself because I didn’t have enough squares, so I had to cut more to go all the way around the quilt. Not to mention that I still need to make them pointy.
Ok, I get the prairie points done, overlapped and sewed to the outer 4 edges of the quilt. Now to add the backing.

So back to the video I go to make sure that I have the information I need to stuff all of the blocks. I start cutting out the Hobbs Polyester batting into strips and then into squares and realized that I didn’t have nearly enough batting to fill all of the blocks. Who knew that a queen size bag of batting wasn’t going to be enough? Not me, apparently.
Now I am in a panic, I am so close to being done that I don’t know what to do. I am a home body and shop on line and didn’t want to wait for more batting to be delivered. Nor did I want or need a whole bag of batting. So I grabbed all that I could from my stash, which I was planning to use for Christmas ornaments. When that ran out, I headed straight to my Hobbs 80/20 batting scraps and filled the rest of the blocks.
Let me just say that the lady in the Puffy Quilt Made the Easy Way said that you had to add a backing to the quilt. So I measured out the quilt top and measured out a piece of fabric the same size as the top and put them right sides together and sewed on 3 sides. I trimmed the corners and turned the quilt right side out.
Now to stuff the blocks. The video said to sew between the blocks, but only up two rows at a time. This would allow you to reach into the quilt and stuff each block individually. Then when that was done I needed to go back to the first row and sew them shut, making sure that the backing was flat because I was sewing through all layers.
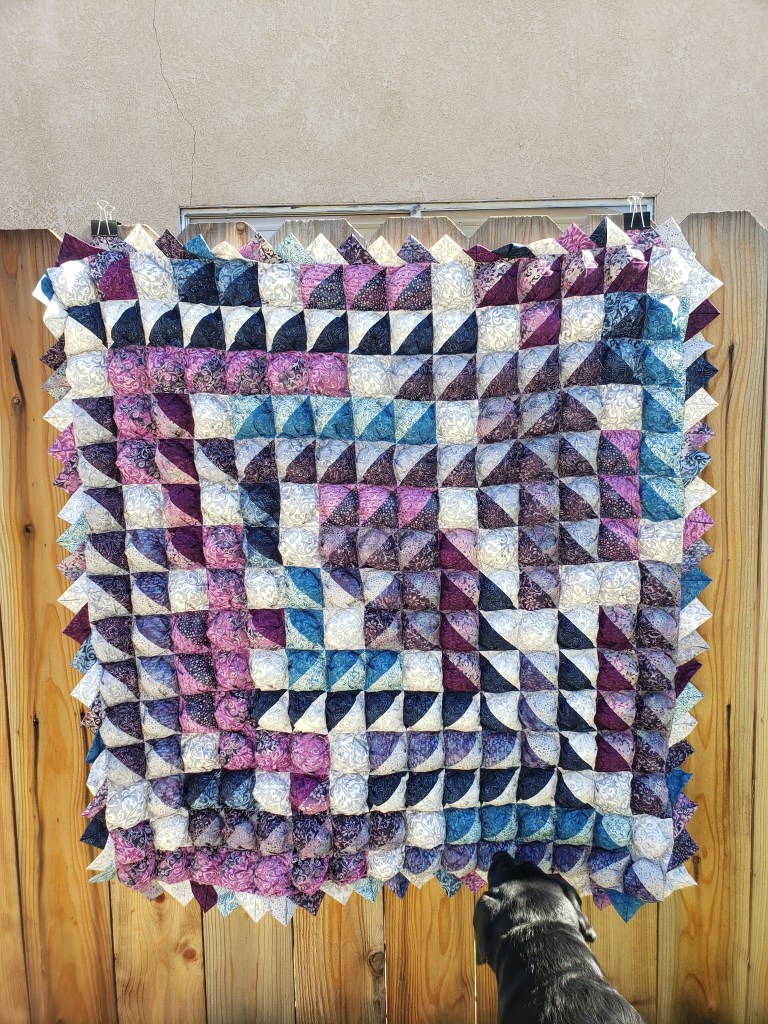
I continued to do this to all 15 rows of the quilt until I was done. I was sore from pushing and pulling, my hands were cramping, and I really just needed a break (more Koolaid) but I still had to close up the last seam. I am almost there and I can see that train! I get the last side of the quilt backing pressed under, pinned to the top, and to the sewing machine I go (hopefully) for the last time. I did it! It worked! It is finished!!!!! Take a look at the last picture in my blog and let me know if you are able to see the counting pattern!!! A suggestion if you are wanting to make this Skip Quilt for kids, use Island Batiks’ solids in primary colors which will make it easier for the children to count the puffs!!!

Now lets see, have I learned anything? Yes, never say never, keep the plan small and simple, sew with more lights on to avoid those bright ideas, and just try and enjoy the process of learning something new.
Not all quilts are created equal or even created in the same manner, but each quilt I make has a story to tell and a life of its own. I will say that out of all of the quilts I’ve made and put on my bed to take a picture of, this one now fits because it is all puffed up. It is the only quilt that my dog, Koa, has jumped up on. I am still debating if I will ever let her jump on it again, as this was a lot of work. But like I said, “never say never!”
“Skipping” into the challenge for March. Woo-hoo! This challenge allows me to make anything I want with the specified fabrics… I am so looking forward to taking on the March challenge! But what will it be? One thing’s for sure, I will make it KISS – Keep it Sweet and Simple! Can you guess what I’m going to make? Wish me luck! Until next time, what is on your sewing table today??

Leave a comment